In this post I want to discuss how menu navigation is handled in Pongbat.
For Pongbat I wanted the user to be able to navigate using either mouse, keyboard or gamepad. I make use of the suit library for drawing the user interface and suit itself doesn’t have any capability to handle navigation.
One nice aspect of suit is that it draws layouts using a table-like system. As such, items in the menu are by default horizontally or vertically aligned, which can result in the following menu screens:
 The main menu only allows vertical navigation between buttons.
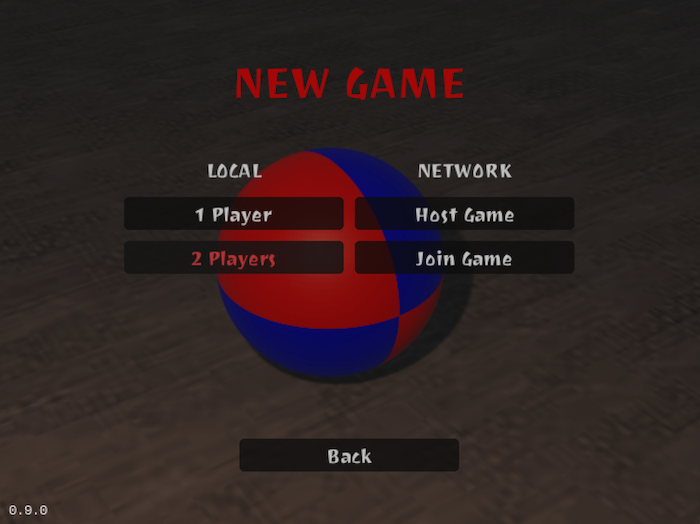 The new game menu allows both horizontal and vertical navigation between buttons.
To internally keep track of the current highlighted item and items adjacent to the current item, I created a graph-like system. The graph represents the nodes that make up the menu. Each node contains list of connected nodes. The connections can be made either horizontally or vertically.
The menu item graph node implementation is as such:
local menuItemGraphNode = Class {} -- based on hump.class

local function getSize(table)
	local size = 0
	for _, _ in pairs(table) do size = size + 1 end
	return size
end

function menuItemGraphNode:init(id)
	self.id = id

	self._left = {}
	self._right = {}
	self._up = {}
	self._down = {}
end

function menuItemGraphNode:connect(node, direction)
	if direction == 'left' then self._left[node.id] = node
	elseif direction == 'right' then self._right[node.id] = node
	elseif direction == 'up' then self._up[node.id] = node
	elseif direction == 'down' then self._down[node.id] = node
	else error('direction should be left, right, up or down')
	end
end

function menuItemGraphNode:getLeftNodes()
	return getSize(self._left), self._left
end

function menuItemGraphNode:getRightNodes()
	return getSize(self._right), self._right
end

function menuItemGraphNode:getUpNodes()
	return getSize(self._up), self._up
end

function menuItemGraphNode:getDownNodes()
	return getSize(self._down), self._down
end

return menuItemGraphNode
When retrieving a list of adjacent nodes, I return both the amount of nodes and a node list.
The menu item graph class is a bit more complicated:
local menuItemGraph = Class {} -- based on hump.class

--[[
  	This function is used when navigating to a new node. If
  	the last highlighted node is part of the nodes list, the
  	last highlighted node with be highlighted once more.
  	Otherwise just return the first item from the node list.
]]
local function getNextHighlightNode(nodes, lastHighlightItemId)
	local lastHighlightNode = nodes[lastHighlightItemId]
	if lastHighlightNode then return lastHighlightNode
	else
		for id, node in pairs(nodes) do return node end
	end
end

-- Initialize the graph with one or more nodes.
function menuItemGraph:init(itemId, ...)
	self._vertices = {}
	self._highlightItemId = nil
	self._lastHighlightItemId = nil

	if itemId then self:addNodes(itemId, ...) end
end

--[[
	Add one or more nodes to the graph; the first item in the
	graph will be highlighted by default
]]
function menuItemGraph:addNodes(itemId, ...)
	assert(itemId ~= nil, "at least 1 itemId is required")

	self._highlightItemId = itemId

	for _, itemId in ipairs({ itemId, ... }) do
		self._vertices[itemId] = MenuItemGraphNode(itemId)
	end
end

function menuItemGraph:getHighlightItemId()
	return self._highlightItemId
end

function menuItemGraph:setHighlightItemId(itemId)
	local item = self._vertices[itemId]

	if not item then error("item id doesn't exist") end

	self._highlightItemId = item.id
end

--[[
	Connect a node with other nodes based on an orientation.
	Orientation should be either horizontal or vertical. The
	Nodes will be connected with each other accordingly. If
	a node is connected with another node horizontally, the
	nodes will be able to 'find' each other using the nodes'
	getLeftNodes() or getRightNodes() functions.
]]
function menuItemGraph:addEdges(orientation, itemId1, itemId2, ...)
	local itemIds = {itemId1, itemId2, ...}

	for i = 1, #itemIds - 1, 1 do
		local itemNode1 = self._vertices[itemIds[i]]
		local itemNode2 = self._vertices[itemIds[i + 1]]

		if orientation == 'horizontal' then
			itemNode1:connect(itemNode2, 'right')
			itemNode2:connect(itemNode1, 'left')
		elseif orientation == 'vertical' then
			itemNode1:connect(itemNode2, 'down')
			itemNode2:connect(itemNode1, 'up')
		else
			error("orientation should be horizontal or vertical")
		end
	end
end

function menuItemGraph:getItemIds()
	local itemIds = {}

	for _, item in pairs(self._vertices) do
		itemIds[#itemIds + 1] = item.id
	end

	return itemIds
end

-- Highlight a node upwards of the current highlighted node
function menuItemGraph:highlightUp()
	local highlightItemNode = self._vertices[self._highlightItemId]
	if not highlightItemNode then return end

	local size, upNodes = highlightItemNode:getUpNodes()
	if size > 0 then
		local nextNode = getNextHighlightNode(upNodes, self._lastHighlightItemId)
		self._lastHighlightItemId = self._highlightItemId
		self._highlightItemId = nextNode.id
		return true
	end

	return false
end

-- Highlight a node downwards of the current highlighted node
function menuItemGraph:highlightDown()
	local highlightItemNode = self._vertices[self._highlightItemId]
	if not highlightItemNode then return end

	local size, downNodes = highlightItemNode:getDownNodes()
	if size > 0 then
		local nextNode = getNextHighlightNode(downNodes, self._lastHighlightItemId)
		self._lastHighlightItemId = self._highlightItemId
		self._highlightItemId = nextNode.id
		return true
	end

	return false
end

-- Highlight a node on the left of the current highlighted node
function menuItemGraph:highlightLeft()
	local highlightItemNode = self._vertices[self._highlightItemId]
	if not highlightItemNode then return end

	local size, leftNodes = highlightItemNode:getLeftNodes()
	if size > 0 then
		local nextNode = getNextHighlightNode(leftNodes, self._lastHighlightItemId)
		self._lastHighlightItemId = self._highlightItemId
		self._highlightItemId = nextNode.id
		return true
	end

	return false
end

-- Highlight a node on the right of the current highlighted node
function menuItemGraph:highlightRight()
	local highlightItemNode = self._vertices[self._highlightItemId]
	if not highlightItemNode then return end

	local size, rightNodes = highlightItemNode:getRightNodes()
	if size > 0 then
		local nextNode = getNextHighlightNode(rightNodes, self._lastHighlightItemId)
		self._lastHighlightItemId = self._highlightItemId
		self._highlightItemId = nextNode.id
		return true
	end

	return false
end

return menuItemGraph
For simple menu screens the navigation using keyboard, gamepad or mouse has become pretty trivial. For example in the main menu screen we setup navigation as follows:
function menu:init()
    -- intialize base scene class with a title and background iamge
	Scene.init(self, 'LETHAL PONGBAT', textures['background-menu'])

	-- create a navigation graph with some nodes
    local graph = MenuItemGraph(ID_BUTTON_PLAY, ID_BUTTON_SETTINGS, ID_BUTTON_CREDITS, ID_BUTTON_QUIT)
    -- connect nodes in graph vertically
    graph:addEdges('vertical', ID_BUTTON_PLAY, ID_BUTTON_SETTINGS, ID_BUTTON_CREDITS, ID_BUTTON_QUIT)
    -- set graph in base scene class
    self:setMenuGraph(graph)
end
A menu item graph is created with a list of menu item id’s. Since the main menu only exists of a single column, we connect each menu item id vertically.
The update loop then finds the current highlighted item (which is retrieved from the menu item graph) or in case of mouse input we ignore the highlighted item.
In suit, set the current highlighted node id to hovered, which (in case of keyboard and gamepad) with allow for sticky highlighting. In case of mouse input, suit is responsible for showing hovered state when the mouse pointer is hovering above a control. So in case of mouse input, by default disable highlighting.
function menu:update(dt)
	Scene.update(self, dt)

    suit.layout:reset((VIRTUAL_WIDTH - UI_CONTROL_WIDTH) / 2, self:getTopY() + UI_CONTROL_HEIGHT + UI_PADDING, UI_PADDING, UI_PADDING)

    local highlightId = self:getHighlightItemId()
    if self:getInputMode() == INPUT_MODE_MOUSE then highlightId = nil end
    suit.setHovered(highlightId)

    local x, y, w, h = suit.layout:row(UI_CONTROL_WIDTH, UI_CONTROL_HEIGHT)
	if suit.Button("New Game", { id = ID_BUTTON_PLAY }, x, y, w, h).hit then
		return Gamestate.push(Play {})
	end

    x, y, w, h = suit.layout:row()
	if suit.Button("Settings", { id = ID_BUTTON_SETTINGS }, x, y, w, h).hit then
		return Gamestate.push(Settings {})
	end

    x, y, w, h = suit.layout:row()
	if suit.Button("Credits", { id = ID_BUTTON_CREDITS }, x, y, w, h).hit then
		return Gamestate.push(Credits {})
	end

    suit.layout:push((VIRTUAL_WIDTH - UI_CONTROL_WIDTH) / 2, self:getBottomY())
    do
        x, y, w, h = suit.layout:row(UI_CONTROL_WIDTH, UI_CONTROL_HEIGHT)
    	if suit.Button("Quit", { id = ID_BUTTON_QUIT }, x, y, w, h).hit then quit() end
    end
    suit.layout:pop()
end
To process keyboard input, the main class forwards all released keys to the current scene. The base scene contains a simple implementation for handling keyboard input:
function scene:keyreleased(key, code)
	-- if no menu item graph was configured, we don't allow keyboard navigation
    if not self._menuGraph then return end

    -- only allow keyboard navigation if user is not entering text in a suit
    -- input control
    if not self._isTextInputEnabled then
    	-- make sure keyboard input in suit is disabled
        suit.grabKeyboardFocus(nil)

        -- switch input mode to keyboard, so highlighting becomes 'sticky'
        if inputMode ~= INPUT_MODE_KEYBOARD then
            setInputMode(INPUT_MODE_KEYBOARD)
            return
        end

        -- use the graph to highlight next node, or activate current item
        -- activating a button will raise the hit event
        if key == 'up' then self._menuGraph:highlightUp()
        elseif key == 'left' then self._menuGraph:highlightLeft()
        elseif key == 'right' then self._menuGraph:highlightRight()
        elseif key == 'down' then self._menuGraph:highlightDown()
        elseif key == 'space' then suit.setHit(self._menuGraph:getHighlightItemId()) end
    else
    	-- if we are currently entering text in suit input field, end
    	-- input if user enters return key
        if key == 'return' then self._isTextInputEnabled = false end
    end
end
Mouse input handling is even easier. The default implementation in the base scene class is as follows:
function scene:mousemoved(x, y, dx, dy, istouch)
	-- when the user is entering text in a suit input field, ignore mouse
	-- movement
    if self._isTextInputEnabled then return false end

    -- on mouse movement, switch to mouse input mode
    if inputMode ~= INPUT_MODE_MOUSE then
        setInputMode(INPUT_MODE_MOUSE)
    end

    -- notify suit of the current mouse position, so suit can handle hovered
    -- and hit states
    suit.updateMouse(x, y, istouch)
end
For handling game controller input, I added a separate class which has callbacks when a game controller button is released. The base scene makes use of this class as follows:
function scene:init(title, background)
    self._background = background
    self._title = title
    self._menuGraph = nil
    self._isTextInputEnabled = false
    self._inputController = GamepadInputController()
    self._inputController.onRelease = function(id, key)
        if key == 'up' then self._menuGraph:highlightUp()
        elseif key == 'down' then self._menuGraph:highlightDown()
        elseif key == 'left' then self._menuGraph:highlightLeft()
        elseif key == 'right' then self._menuGraph:highlightRight()
        elseif key == 'action' then suit.setHit(self._menuGraph:getHighlightItemId()) end
    end
    self._inputController.onAdded = function(id) setInputMode(INPUT_MODE_GAMEPAD) end
end

function scene:gamepadpressed(joystick, button)
    -- body
end

function scene:gamepadreleased(joystick, button)
    if inputMode ~= INPUT_MODE_GAMEPAD then
        setInputMode(INPUT_MODE_GAMEPAD)
    end
end

function scene:joystickadded(joystick)
    self._inputController:joystickAdded(joystick)
end

function scene:joystickremoved(joystick)
    self._inputController:joystickRemoved(joystick)
end

function scene.joystickreleased(joystick, button)
    if inputMode ~= INPUT_MODE_GAMEPAD then
        setInputMode(INPUT_MODE_GAMEPAD)
    end
end
The scene’s input mode also switches to INPUT_MODE_GAMEPAD when a gamepad is connected or a button is released on the gamepad. Again, setting the input mode property is required to allow for ‘sticky’ menu highlighting. Also, I make a distinction between gamepad and keyboard input modes, since some menu’s should probably only be accessible when using a keyboard.
To be honest I am not 100% happy with the code required to handle different types of hardware inputs, so in the future I will look into using other libraries to simplify te codebase. I will probably try to add baton for my next LÖVE project, as it seems pretty simple to implement and use.
Conclusion
Using a graph-like system for menu navation work well when combined with an immediate-mode GUI like suit.